


SAFARI
Users
Selecting Suitable Oils
Storing Oils
Cooking Methods
using Oils- Sauté
- Braising - Stovetop & Oven
- Stewing
- Pan Frying
- Stir Frying
- Roasting
- Baking
- Dressing Salads
Safety
Smoke Point and Composition Chart
- a comparative summaryOils, Fats & Health
- raging controversy prevailsMain Oils Page
- More information on Oils
Selecting Suitable Oils
Even the most casual cook needs at least two oils: a high temperature oil (400°F+) for deep frying, sauté and stir frying, and a flavorful oil like extra virgin olive oil for salads and low temperature cooking. If I wanted to minimize the number of oils I had on hand, I'd select Butter, Extra Virgin Olive Oil, and Pure Olive Oil (and dark Sesame for Oriental stuff - but not as a cooking oil). Actually, I usually have a half dozen oils on hand.
High heat destroys oils (polyunsaturates much faster than others) and the byproducts of breakdown don't taste good and are possibly carcinogenic. You can use a high temperature oil at low temperatures (sacrificing flavor) but never use an oil higher than its rated range. With flavorful oils, keep well away from the maximum or you will lose the flavor you paid extra for.
Health factors are also a consideration, but intense controversy surrounds cooking fats and oils (see our Oils, Fats and Health page), because a lot of money at stake. The chart below serves the three leading theories including the "Anything in Moderation" theory which can select from either column. Currently the "Dissident" group is gaining favor and the "AHA" group is in decline, despite the vast amount of money poured in to support that side. Many top chefs are now comfortable returning to traditional fats and oils.
| Saturated = Good Monounsaturated = Good Polyunsaturated = BAD! Trans Fats = BAD! BAD! BAD! (Dissident Researchers) |
Saturated = BAD! BAD! Monounsaturated = Good Polyunsaturated = Better Trans Fats = Not so bad (Heart Assoc. Grain Traders) |
|
|---|---|---|
| Spread | Butter | Tub Margarine (not block) |
| Salad Oil | Olive Ext Virgin Nut Oils etc. |
Olive Ext Virgin Safflower |
| Braising to 225°F/107°C |
Olive Ext Virgin Butter |
Most Unrefined Oils |
| Frying, Light to 320°F |
Olive Ext Virgin Coconut Oil Butter Lard* |
Olive Ext Virgin UnRefined Peanut UnRefined Canola SemiRefined Safflower |
| Frying Deep Fry to 350°F |
Coconut Oil Butter (clarified) Lard* or Tallow Goose or Duck Fat |
SemiRefined Canola SemiRefined Soy Vegetable Shortening |
| Sauté, Moderate Deep Fry to 400°F |
Olive Oil Pure Olive Oil |
Olive Oil Grape Seed Refined Canola |
| Sauté, Hot Stir Fry Deep Fry to 440°F |
Olive-Pomace Olive Ext Light Ref High-Oleic Sunflower |
Refined Peanut Refined Sunflower Refined Corn Refined Soy |
| Sear: to 500°F | Avocado | Refined Safflower |
| For more precise temperature ratings see our
Oil Smoke Point & Composition Chart
but keep in mind these temperatures are approximate as oils vary. * Lard: Render your own from pig fat. Commercial tub lard is hydrogenated, bleached, preserved and otherwise unfit for consumption. | ||
Storing Oils
Most oils are highly perishable because unsaturated fats are subject to oxidation and rancidity. All contain significant amounts of unsaturated fats (with the notable exception of coconut oil which is darned near eternal). Those high in polyunsaturates are most vulnerable and should be used in less than 6 months of opening while monounsaturates (Olive Oil) will last a year properly stored.
Properly stored means in a tightly sealed glass jar or oil can in a
cool dark place. You can store oils very much longer if you refrigerate
them, but all (except Safflower Oil) will solidify to some extent,
particularly Olive Oil. This is not damaging and left at room temperature
for a while they'll re-liquify. I keep dark Sesame Oil in in the
refrigerator, but the rest I use up fast enough to store at room
temperature.
Cooking Methods
Sauté
There is confusion here because a great many writers now use the word "sauté" for what would more properly be called stir frying, or "fry stirring" as used on Clovegarden as "stir fry" means something very specific to some people. Here we describe the original meaning of "sauté.
A small amount of oil is used at high temperature to quickly brown ingredients. Heat the pan moderately, add the oil and turn up the heat to bring the oil up to near its maximum temperature - but it should not smoke because that damages the oil. Then add the ingredients and leave to brown on one side. Make sure they have plenty of space and don't move them around. When done, turn over to brown the other side, again without moving (for vegetables you will have to move them around more).
Sautéing is a favorite technique for restaurant chefs because it can be very quick and requires only modest attention once you're good at it. Clearly though, sautéing takes a bit more practice than most cooking methods since you have to get the heat and timing right by experience.
Incidentally, this searing does not "seal the meat" as so many sources state, it is of use only for flavor. Careful testing has shown the meat will lose the same amount of liquid in cooking as if it had not been seared.
Good oils to use are Olive Pomace and Avocado, but other oils and fats can be used within their temperature range.
Meats must be tender cuts or they will just toughen, Depending on the recipe they may be floured or not. If not, they should be dry and brushed lightly with oil to prevent sticking. If floured, they should be dried before coating. Meat should be cut thin enough to cook through (for thicker cuts, after sautéing the sauté pan can be moved directly into a hot oven to finish cooking). Vegetables should be cut so they will all cook in the same time, hard vegetables small, soft vegetables larger (or you can cut them uniform and add in stages).
In some cases more ingredients may be added at the end of sauté and the pan may be "deglazed" (by wine or flambé with brandy) to provide additional flavoring, or a sauce may be made.
Equipment:
The straight sided covered pan we call a sauté pan is not the ideal device for sautéing and would be more accurately called a "braising pan". The ideal device for sautéing is a shallow pan with sloping sides and very good heat conducting properties (cast iron or aluminum core stainless or such). The more open shape allows steam to escape faster than in a straight sided pan.Braising - Stovetop & Oven
Here you start by frying the main ingredients in a small amount of oil, similar to sauté or stir fry. Ingredients may be added in the process, such as starting with onion, then adding meat, garlic and ginger while continuing to fry. Once you've reached the proper state of brownness, you add a small amount water or stock (and probably a few more ingredients), cover tightly and either simmer on the stovetop, or in a preheated oven until the ingredients are tender. The recipe is often finished up on the stovetop.
The most common oils are Butter and/or Olive Oil, Others can be used. Some people say to cut the Butter with some Olive Oil to raise the smoke point, but all this actually does is hide the fact that the butter is being damaged by excess heat. The main ingredients may be cubed, or may be put in whole and rotated now and then to brown on all sides.
For Stovetop Braising, after browning put in enough water or stock to come up about 1/3 of the depth of the ingredients. Cover tightly and bring to a simmer. Check the liquid occasionally and turn the ingredients for even cooking. The pot must never run dry. Meat is done when it's fork tender.
For Oven Braising, after the browning step, put in enough water or stock to come up about 1/4 of the depth of the ingredients. Cover tightly and place it in an oven preheated to between 325°F/160°C and 350°F/175°C. Meat is done when it's fork tender.
Whether braised on the stovetop or in the oven, many dishes end up back on the stovetop for finishing. The main ingredients are often removed and the remaining ingredients made into a sauce which then accompanies the main ingredients.
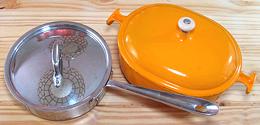
Equipment:
For stovetop or oven braising both Dutch ovens and covered sauté pans are used. The Dutch shown here is oval, which I prefer for fit to oblong things, but round ones work as well Covered casseroles can also used if you're sure they're flameproof.Stewing
Stewing is pretty much the same as Braising
except you put in enough water or stock to pretty much cover the
ingredients. Again, it starts on the stovetop with browning, and
generally ends on the stovetop with the finish seasoning, reduction
or thickening, but the middle portion can be done either on the
stovetop or in the oven.
Pan Frying
Pan Frying is similar to sauté except more oil is likely used and the ingredients are moved and turned more often. Generally the ingredients are removed entirely from the frying pan when sufficiently browned and the oil does not become part of a sauce, but may be used to fry additional items.
Again, butter and olive oil are the most used oils, but many others including lard, duck fat, goose fat, and even chicken fat (especially if you're Jewish) are frequently used - unless you subscribe firmly to column 2 of the selection chart above.
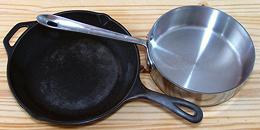
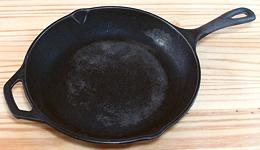 Equipment: For pan frying, the best pan is a shallow heavy
cast iron pan that has been well and properly seasoned. Some people select
non-stick pans, but I'm a firm believer that all coatings become worn,
torn, scratched, dissolved or burned away in short order - proper
seasoning is a constantly renewable non-stick coating. Some others use
non-stick for for the single purpose of frying scrambled eggs and avoid
it otherwise.
Equipment: For pan frying, the best pan is a shallow heavy
cast iron pan that has been well and properly seasoned. Some people select
non-stick pans, but I'm a firm believer that all coatings become worn,
torn, scratched, dissolved or burned away in short order - proper
seasoning is a constantly renewable non-stick coating. Some others use
non-stick for for the single purpose of frying scrambled eggs and avoid
it otherwise.
Your beautiful and costly multiply stainless / aluminum / copper frying / sauté pans are not at all ideal for heavy frying. Stuff will tend to stick badly to the unseasoned surfaces and the pan will be very difficult to clean with baked on oil. A well seasoned iron pan will fry beautifully and is supposed to have a thin coating of baked on oil - but don't let it form a crust which will eventually start flaking off into the food.
Again, non-stick is not ideal as the coating degrades and may become
toxic if overheated. Most chefs detest non-stick, with one exception -
many keep a non-stick pan for scrambled eggs.
Stir Fry
Stir frying refers to an Asian technique generally executed in a wok, a wide shallow pan of spherical shape. This technique uses a small amount of oil at high temperatures to cook ingredients very quickly preserving flavor and texture. The oil may become part of the recipe if a sauce is made.
"Stir fry" is often used in the context of Western cooking simply because it's easier to say and write than "fry stirring". Oriental stir frying can be done in a sauté pan, but it will require more oil and it may be rather cramped for ingredients that wilt down during cooking - and you can't park ingredients up on the cooler sides as you can with a wok.
All in all, Western stoves are not ideal for woks. Round bottomed versions must be placed on a ring stand which may hold them too far from the flame, and the hottest part will be around the center not at the center. I strongly prefer wire stands to sheet metal rings, and with either I make cuts in them so they fit tight over the burner, with the wok closer to the flame.
Many stir fry recipes, especially where meat is involved, describe it in a way that simply can't happen on a home stove. A home stove just can't deliver the volume of heat (BTUs) a restaurant stove can, and can't instantly evaporate all the liquid exuded from the meat. In China, restaurants often heat the wok so hot that when they toss in the oil it bursts into flames reaching for the ceiling - not recommended for the average home kitchen.
The wok's native stove is a clay charcoal box with a round wok fitting hole at the top. These stoves are very hot and maximum heat is in the very center of the wok. Keeping this in mind, good results can still be achieved on a Western stove.
A high temperature oil of neutral flavor should be used. Preferred oils are Olive Pomace, Avocado, and Peanut. Because the frying time is very short and the oil will not be reused, you can choose an oil higher in polyunsaturates such as Grapeseed, Sunflower or Safflower. Actually, since my wok is seldom going to reach anywhere near Chinese restaurant temperatures, my usual stir fry oil is Pure Olive Oil (not Virgin).
Stir frying starts by heating the pan and poring in the required amount of oil (usually 1 to 2 Tablespoons). Spread it up the sides and bring it up to near smoking temperature over very high heat, or, if you don't have an infra-red surface thermometer, until you see the first wisp of smoke). Start adding ingredients per the recipe.
The key to successful stir frying is cutting and organization. Cut ingredients to uniform size and thin enough to cook through very quickly. All preparation must be done in advance because the process is too fast and needs too much attention to permit prep work. If you're having rice it should be completely cooked. Start the stir fry during the rice's 10 minute resting time.
Heat the oil very hot for meat (but never smoking which damages the oil) and moderately hot if starting with garlic, ginger and the like. A good strategy is to cook any meat first at high temperature and set it aside. Fry other ingredients at a more moderate temperature, then add the meat back in when about done. Keep in mind the wok must never be overloaded.
If meat is to be cut thin or shredded, it'll be easier if you sit it in the freezer for 20 minutes or so - enough to stiffen it a bit but not freeze it. Start adding ingredients with aromatics (garlic, ginger, etc.) and then in order of cooking time. It takes a little practice to judge the timing. Ingredients should be tumbled very frequently to assure even cooking.
If some ingredients are done while others are not done yet, you can keep the done ones from getting overcooked by parking them up on the cooler sides of the wok. Many recipes call for a finish steaming or braising covered with a tight fitting wok lid (return any removed meat for this step) and/or making of a sauce just as with sauté. You can push ingredients up the sides and start a sauce in the bottom, then mix the ingredients back down into it.
Equipment:
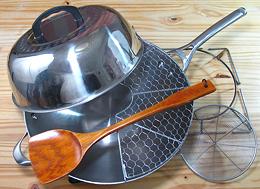
Best is to use a wok, a shallow spherical pan which should be about 14 inches across, or at least 13 inches, for home use. To fit it on a Western burner you need a ring stand (I strongly prefer a wire stand as shown in the photo), and you need a wide shovel that fits the curve of the pan. For a carbon steel wok, a metal shovel is usually used, but for a multi-ply it should be wooden because the surface should not be marred or stuff will stick. You also should have a slotted spatula for lifting ingredients without taking too much oil or liquid, and a wire "Spider" (lower right corner in the photo, but it's handle isn't showing) for lifting things out of deep oil. A special fitted wok lid for finish steaming or braising is essential.Carbon Steel Wok:
Most preferred by hard core wok chefs is a heavy gauge bare carbon steel wok, seasoned well with oil. This is the kind of wok that responds most quickly to changes in stove temperature, providing maximum control. The 14 inch one I have was made by Atlas Metal Spinning in San Francisco and is of very fine quality with a long wooden handle. Unfortunately, Atlas no longer makes them. Most woks have loop handles which must be handled with pot holders or oven mitts.Multi-Ply Stainless Wok:
Despite having the Atlas, I do most of my routine stir frying in a 13 inch multi-ply Calphalon wok, for which I purchased a stainless lid from an Asian grocery. It is certainly not as responsive as my 14 inch Atlas but is more convenient because it is just a little smaller (though perfectly adequate for cooking for two or three), has a small flat area in the bottom so it doesn't need a ring stand, and it's very easy to clean.Cast Iron Woks:
These are extremely rare, though I have a Japanese one I inherited from a mad Russian (redundant, I know - there isn't any other kind). It is a bit heavy to work with and much less responsive than the muti-ply Calphalon, but it does fry evenly. Chinese Cast Iron Woks are not available in North America. They are so thin even a moderate blow will destroy them, but some Chinese wok chefs really like them (and always keep spares).Chef's Pan:
Another option, and now sometimes called a "Western Wok". This has a wide flat bottom, is fairly deep, and the sides curve up smoothly. Multi-ply is best. The downside of this pan is its relatively low sides and small diameter. With a regular Wok, you can toss in a huge pile of raw greens all at once and start wilting them, but the Chef's Pan doesn't have that much capacity. For many jobs it will require more oil than a round Wok.Non-stick Woks:
These are an abomination. They cannot handle the high temperatures without emitting toxic gasses, and they can't handle the abrasion they are likely to encounter.Electric Woks:
Horrid things - they don't get hot enough, and the heater element is well up from the center, making a hot ring up where it should start getting cooler, and the center is cool where it should be hottest.Electric Stove:
If you're stuck cooking with electricity (I shed a tear for you), you're better off using a Chef's Pan (see above) which will have good contact with the heating element. Because electric burners respond very slowly, expert wok cooks often keep a front burner very high and a back burner lower so they can shuffle the pan between the burners. If your electric stove is an induction range, the only practical choice is a Chef's Pan with a magnetic outer layer (most multi-ply pans have this). Heat responsiveness should be better than with conventinal heating elements.Deep Frying
For deep frying, heat your oil very hot (but never hotter than it's rated for). Take care not to overload it with ingredients so the temperature stays very high. If it falls too low the items fried will become soggy with oil.
Take particular care with meat that has been previously frozen because it exudes a lot of water quickly. Meat that has not been frozen exudes just as much, but more slowly. Meat should be thoroughly drained and firmly patted dry with paper towels, then fry in small batches.
Frying in small batches will take no longer than frying one big batch, but the results will be much better. In particular meat will be browned before it dries out inside.
In general, 350°F/175°C is a good starting point for most ingredients, but if you're using a 350°F fat like lard, keep it a bit lower. For some ingredients I find 410°F/210°C works better You should be applying enough heat that the oil comes back to maximum temperature by the time the current batch is fully done.
For French fried potatoes, the experts recommend "blanching" by frying at 350°F/175°C until cooked through. When ready to serve do a final browning fry at 365°F/185°C.
For donuts and similar fried bread items a fat solid at room temperature is highly preferred so they don't drip oil all over everything. Lard and tallow are best, but "Zero trans fat" vegetable shortenings are usable.
Equipment
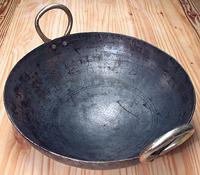
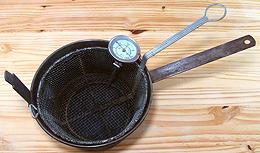
: In my experience, the Indian kadhai (left photo) is the ideal deep fry vessel for home use, needing far less oil than other devices and minimizing messy splatter. Its spherical shape has a shorter radius than the Asian wok, and higher sides. These same high sides make the kadhai less suitable for Asian stir fry because you can't park stuff up on the sides. The kadhai will need a ring stand (see above under wok) and a second ring stand so you can move a hot kadhai off the stove onto the kitchen floor (or some other surface) when done frying.The European deep fry pot and basket (right photo) also work well - for frying, but you're going need a lot more oil, and have a lot more splatter to clean-up. Your stove will be dripping. Do clean up right away because oil starts turning to varnish immediately and will be a lot harder to clean up in a day or two.
Of course there are now electric deep fry units, but they get rather mixed reviews so do your research before buying one. Like the European deep fry pot They do take a whole of oil, but splatter is not such a problem.
Reusing Deep Fry Oil is permissible, within limits IF it is a very durable oil. Olive-Pomace and Avocado oils are best on the vegetable side, Beef tallow on the animal side. The oil must not have been overheated or otherwise abused, and must be filtered through a paper towel and stored carefully. See the "Oxi" column in our Smoke Point & Composition chart for durability. The lower the number the more durable the oil or fat.
Most common vegetable oils have very high oxidation numbers which means they aren't good for deep frying and quickly suffer heat rancidity (possibly carcinogenic). This is why the fast food industry, hounded by do-gooders to stop using beef tallow (safe and very durable) rejected them, switching to partially hydrogenated vegetable oils (Trans Fats) which are similarly durable - but they are now considered far more harmful than the beef tallow they replaced. Score yet another "Fail" for the do-gooders.
When reusing oil, don't use oil fish was fried in to fry anything else because it will have a strong fish flavor. In restaurants, oil for potatoes is kept separate, but for the limited reuse in a home kitchen I don't consider this at all necessary. My rule is to use durable oil and no more than 4 times over the period of a month, discarding it when either limit has been reached, or if it has darkened substantially.
To store oil for reuse, let it be hot long enough after removing
ingredients to make sure it has no moisture (there should be no bubbling
or popping. Filter it through a white paper towel set in a wire strainer
to remove all food particles (you may need several towels if debris in
the oil clogs them). Store in a clean tightly sealed glass jar.
Roasting
Roasting usually refers to cooking birds and large pieces of meat in an oven at between 350°F and 400°F. The main source of oils is the fat contained in the bird or meat, but oil, usually Butter but sometimes Lard, Bacon Fat or Olive Oil may be brushed on, usually at the beginning or after turning.
Large vegetables such as squash and eggplants may also be oven roasted, generally in a shallow pan or on a grill. If cut, they will be brushed with butter or oil.Roasting is now also used to cook small cut vegetables that were formerly fried, particularly potatoes, with little oil or fat. First they are cut to size, then tumbled with oil to coat, and roasted on a baking sheet in the oven. Note: if you grease the pan with lard or tallow rather than vegetable oil it will be much easier to clean.
For larger cuts, 3/8 inch or so of water may be placed in the pan to cook the potatoes, but all will be evaporated by time roasting is done. Temperatures are not that hot so moderate temperature oils can be used.
Sometimes strips of bacon or lard are draped over the meat and the fat that renders from them keeps the meat coated and moist. Once fat starts to render from the meat itself it may be used for basting (brushing or dripping) the meat itself. Always follow the instructions in the recipe unless you have a very good reason not to.
Equipment:
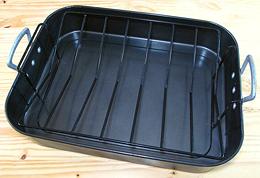
For large birds and meat roasts a special roasting pan is used, a shallow pan which is fitted with either a "V" rack or a flat rack in it to keep the item roasted above the rendered fat and juices (and possible vegetables). Deep, covered roasting pans are also used, although these are somewhat out of style right now. A good meat thermometer with a long probe is a must so you can measure the temperature inside the roast to see if it's safely done. Even better is one with a cable so the probe can be left in the meat while it roasts in the oven with the display continuously visible.Baking
There are two basic categories of baking: baking dough products like breads, cookies, cakes, pie crusts and the like, and baking casseroles (known as "hot dish" in the U.S. Midwest). Baking casseroles may involve no more oil than a rubbing of butter on the inside of the casserole dish to minimize sticking, and perhaps some oily cheese on top. On the other hand, some ingredients may be tumbled with oil before being added to the casserole, and others may be fried on the stove top before being included.
Baking breads, cookies, cakes, pie crusts and similar items always involves fats, generally fats solid at room temperature called "shortening", to provide a pleasant texture when cooled. Your choices here are generally Lard, Butter and Vegetable Shortenings (though some people have successfully (for certain values of success) used oils for some baking). For flavor and texture Lard is considered best, preferably "leaf lard" from around the kidneys if you can get it.
People trying to avoid saturated fats turned to vegetable shortening and ended up with a Trans Fats problem that is a lot worse. "Zero trans fats" vegetable shortenings are now available, but are, of course, high in artificial (fully hydrogenated) saturated fats - they're vegetable saturated fats though, which makes some people (especially people at Cargill and ADM) feel better about them.
Baking dough products is highly critical in measurement, ingredients,
temperature and timing, so follow the recipe with exacting care and use a
timer with a loud alarm if you're likely to get distracted. Writers
expert in baking want to specify recipes in weight rather than volume,
which would be much more accurate, but cookbook publishers demand the
traditional measures.
Dressing Salads
Salads is where to use those "virgin", "cold pressed" or "unrefined" oils that are high in flavor but have a smoke point too low for frying. The run-away favorite here is Extra Virgin Olive Oil - superb flavor and healthy composition both.
The disadvantage of olive oil is that it solidifies in the refrigerator because it is low in polyunsaturated fats. This does no damage, just take your dressing out of the fridge 20 minutes before you need it.
Commercial salad dressings favor Safflower Oil because it is so high in polyunsaturated fats it's still liquid in the refrigerator. This sacrifices flavor compared to Olive, so they add more flavoring ingredients to make up for that. Some theories hold that polyunsaturates aren't good for you but at low salad temperatures the risk is a lot less.
When making salads, you should spin the ingredients dry and then coat with oil before you add vinegar. Oil will not properly coat ingredients that are wet with water or vinegar. In any case, don't apply dressing until you're about ready to serve or the salad will wilt.
Equipment:
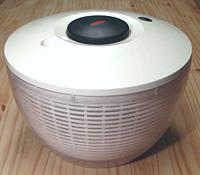
You really need a salad spinner to get salad greens dry enough for the oil to coat properly. The French wire basket on a chain and the French wire basket with a toy top pump action are absolutely worthless (and may be extinct). Many plastic spinners are made that work pretty well, most with a crank action, but if you've got your wits about you you'll get an Oxo (illustrated). You also need a couple jars or bottles to shake dressings up in.Safety
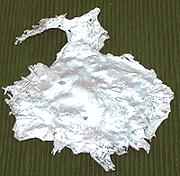 Cooking with oil at high temperature is dangerous and requires close
attention. Connie's brand new stove was a lot hotter than her old one,
and she turned her back on a pot of oil heating for deep frying. This
splash of aluminum (once a sliding door) is all that remains of Connie's
luxury home.
Cooking with oil at high temperature is dangerous and requires close
attention. Connie's brand new stove was a lot hotter than her old one,
and she turned her back on a pot of oil heating for deep frying. This
splash of aluminum (once a sliding door) is all that remains of Connie's
luxury home.
Much more serious is the possibility of severe personal injury from
spilled oil or oil that splatters from contact with water. Oils are
essential, but so is care.
- Do not overheat oils. When an oil is at its smoke point it's also not far from its flash point, and an oil fire is very serious and difficult to extinguish. NEVER EVER attempt to put out an oil fire with water, you'll have flaming oil splattered far and wide and probably on you. Slide a lid over it or smother it with a cushion. In the oven, keep the oven closed and turn off the heat.
- When adding ingredients to hot oil make sure they're as dry as possible to avoid splattering.
- Never put oil in a wet pan, even with a few droplets. They'll explode while heating, splashing hot oil about.
- Use a cooking vessel that's large enough. Too large is seldom a problem, but too small is disastrous.
- Keep everything clean. Oil and grease buildups, oven or stovetop, can catch fire and be hard to extinguish. Further, cleaning up oil immediately is far easier than cleaning it up later when it's turned to varnish (a mater of a day or two with some oils).
- Keep a fire extinguisher or two handy but not too near the stove. Connie had a brand new industrial size fire extinguisher, but it was mounted too close to the stove and she couldn't get to it.
- Turn pot handles in on the stove to prevent accidents, especially if you have children who could grab a handle and spill hot oil all over themselves.
- When setting cookware aside to cool, always leave a potholder on top to remind that it is very hot.
- Wear sensible clothes, being particularly mindful of sleeves that could snag cookware or otherwise get into trouble. Clothing can protect you from small splashed droplets, but for a serious splash you're better off naked because fabric will hold a volume of hot oil until you are cooked.
- If you burn something, don't quench it with water until it has had time to cool. Cold water into a hot pan can splash hot oil, scald with steam, and often damage the pan. If you can, move it to a metal, tile or concrete surface which will help cool it quickly, but not your cutting board which it'll burn a ring into (or melt if plastic).
- Do not use tired oil or oil that has been damaged by heat. It isn't good for you.