


SAFARI
Users
General Discussion
If at all possible have a second person responsible for the gravy so you can tend to the potatoes, vegetables or what have you.
There are a number of procedures all of which will produce about the same result if done correctly. The procedure given here is, I feel, particularly reliable for persons who make gravy just once or twice a year.
Thickeners other than flour based roux can be used, such as cornstarch, but cornstarch tends to produce an overly shiny "cheap Chinese restaurant" effect and isn't tolerant of reheating.
For complete details and procedures for roasting a turkey, see our page Roasting a Turkey.
Equipment
 You can make gravy with no equipment other than pots, pans and spoons
you already have, but a gravy separator is a huge convenience. It
is not only useful for gravy but can be used every time you make stock.
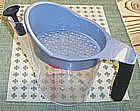
The separator you want is the 4-cup Oxo (illustrated). It has its
own strainer (though I never use that) and the rubber stopper (inserted
before pouring stuff in) prevents fat from getting into the spout as
happens with most separators. It's geometry is such that there's almost
no loss of liquid. It has one glaring flaw, there isn't a brush included
for cleaning the spout. You can buy a cheap bulb baster set to get a
brush that works fine.
You can make gravy with no equipment other than pots, pans and spoons
you already have, but a gravy separator is a huge convenience. It
is not only useful for gravy but can be used every time you make stock.
The separator you want is the 4-cup Oxo (illustrated). It has its
own strainer (though I never use that) and the rubber stopper (inserted
before pouring stuff in) prevents fat from getting into the spout as
happens with most separators. It's geometry is such that there's almost
no loss of liquid. It has one glaring flaw, there isn't a brush included
for cleaning the spout. You can buy a cheap bulb baster set to get a
brush that works fine.
Procedure
Final gravy making should begin the moment the turkey is set aside to rest, but you should have prepared the previous day. Gravy should be ready by the time you carve the turkey (25 to 40 minutes).
Ingredients|
|
------
4 3/4 ------ 1 - 2 8 1 4 3 ------ 6 4 4 1-1/2 tt ------ |
---
oz c --- T t c c --- oz oz oz c --- |
-- Roux
Butter Flour, all purpose -- Stock Oil Turkey Giblets (1) Thyme, fresh Parsley sprigs Bay Leaf Stock (2) Water -- Roast & Deglaze Onion Carrot Celery Wine, dry white Salt & Pepper -------------- |
Notes
|
Day Before
- Make Roux and StockRoux:
This will make plenty of roux to guard against disasters - freeze what's left over for other thickening jobs. Melt the Butter and bring it to frying temperature but do not brown. Add Flour and fry slowly until flour tastes nutty and cooked (but not browned). Careful with your tongue when tasting, this stuff can burn.- Put the Roux in a small bowl in the freezer compartment. As it freezes break it up with a spoon so you end up with a bowl of small to medium frozen lumps.
Stock:
You need to end up with about 5 cups of stock. This is a lot more than the Giblets alone will yield - See Note-2 for solutions.- Take the Giblets and Neck from the turkey, and the Wing Tips (if you have elected to cut them off). Chop the neck into several pieces (a sharp Chinese cleaver knife is perfect for this). Cut the Heart, Gizzard and Liver in half. Also cut up the Wing Tips and Tail if used.
- In a large sauce pan, put one tablespoon of Oil and fry the Turkey Parts, stirring until lightly browned (about 5 minutes).
- Remove the Liver. It won't be used, so you can slice it up and eat it now with a little lemon juice.
- Add Stock and enough Water to make 7 cups. Add herbs and Simmer a couple hours, skimming off any foam.
- Strain Stock and use your gravy separator to defat it, then let stand a bit and decant, leaving behind the debris that sinks to the bottom.
- Pick any recoverable meat off the neck bones and chop it and the giblets quite fine.
- Refrigerate stock and chopped giblets (separately) until needed.
Turkey Day
- Turkey is ready for the oven.- Chop Vegetables (see ingredient list above) and put them in the roasting pan under the rack. Add about 3 cups of water to keep stuff from burning until the turkey starts dripping (rather late in the process) Check periodically to make sure pan hasn't become too dry. Vegies should become very well browned but not burned.
- Check the Roasting Pan to see if it needs more liquid to pour properly. If so, add some of the stock you made yesterday to the pan. Pour the liquid drippings from the roasting pan through a strainer into your gravy separator. Squeeze the solids with a wooden spoon to recover the liquid they retain. Return solids to the roasting pan.
- Let the drippings settle a few minutes, then pour the liquid into your prepared stock, discarding the fat.
- Deglaze the pan: Place the roasting pan over two burners on the stove top. Set the burners to medium and pour in the 1-1/2 cups of White Wine. When it comes to a fast simmer, scrape up the browned bits (fond) stuck to the pan. Note: if you've roasted the turkey by Method #2 (covered pan) there may be no fond to deglaze, just juice.
- Strain the pan juices into the stock, discarding the solids.
- Bring to a fast simmer off to one side of the burner so any scum that rises concentrates in one place and can be easily skimmed off.
- Once skimmed, add in the Giblet pieces and start stirring in lumps of frozen Roux. Note: you will end up with plenty of roux left over so don't just dump it in. Keep stirring and adding roux until the gravy has reached the thickness you desire (it should coat a wooden spoon). Keep in mind that it'll thicken a bit more as it cools.
- Give it a last skimming as needed. Season to taste with Salt and Pepper and serve in a gravy boat.