-------
1
1
1/2
-------
1/2
1
4-1/2
2
1-3/4
-------
1/2
1
1/2
ar
-------
ar
|
---
c
c
c
---
c
c
c
c
c
---
c
c
c
---
|
-- Yeast Starter
Teff Flour (1)
Water (2)
Water
-- Basic Batter
Starter
Water
Flour, Teff
Water
Water
-- Absit
Water
Base Batter
Water
Water to thin
-- Injera
Oil (3)
|
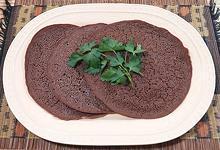
See Gallery for tools used
and more details. These breads weigh about 4 ounces each at 9 inches
diameter.
Make Yeast Starter - Day 1 - (Days 4 - 20 min work)
- In a non-reactive bowl large enough for some expansion, pour 1 cup
Water and slowly mix in 2 cups Teff Flour working it to
remove all lumps. Smooth out the batter and carefully pour another
1/2 cup water over it. This water should cover the batter completely.
Cover the bowl loosely enough to allow some air circulation (I use a
plastic bag) and place in a slightly warm location. Leave sit until
the 4th day.
Make Base Batter - Day 4 - (Days 3 - 30 min work)
- The fermenting bowl should have separated into two layers, with liquid
on top. Carefully pour off the liquid. What's left is your starter. It's
more than you will need for one recipe, but excess can be kept,
(see Starter).
- Select a non-reactive bowl large enough for the whole recipe and some
expansion. Measure out 1/2 cup of the Starter into this bowl
and work in 1 cup of Water. Use your hands so you can feel for
lumps.
- Work in 4-1/2 cups (1 # 2 oz) Teff Flour until all even and as
lump free as you can get it. Work with your hands so you can feel lumps
and crush them. Measure out 2 cups of water and set aside. As you work you
may need to add a little from the reserved 2 cups, until it is all
included. The batter should end up smooth, lump free, and very thickly
creamy.
- Level out the Batter and carefully pour 1-3/4 cups Water over
it. This Water should completely cover the Batter.
- Cover the bowl and set aside as before, for 3 days. It should be
be bubbly and smell yeasty and sour.
Make Absit & Final Batter - Day 7 -
- (4-1/2 hrs - 1/2 hr work)
- Carefully pour the liquid off the top of the Batter.
- In a sauce pan, bring 1 cup of Water to a boil. Whisk in 1/2 cup
of the Base Batter and another 1/2 cup of Water. When this
mixture starts to thicken and bubble, take it off the heat and let cool
until it is just warm. This Absit should have the consistency of a thin
porridge.
- Stir the Absit into the Base Batter until well distributed.
This mix should be just a little thicker than a crepe batter. It will need
to pour fairly well. If you dip your fingers into it, it should run off
leaving only a coating (see
Gallery). Stir in some more Water if it is too thick. If it's
thin enough, but you just can't get rid of lumps, you might use an
immersion blender ont it, but then you'll need a couple extra hours of
final fermentation.
- Cover the bowl and set aside until it's fairly bubbly. This can be 2 to
6 hours depending on yeast activity, temperature, etc. After there are
a fair number of bubbles forming on the surface, it's ready to cook.
Make Injera - Day 7 - (1 hr)
- Start your griddle warming to about 440°F/220°C so it will be
ready and stabilized by time you start to cook. I recommend an
Infrared Thermometer to
confirm temperature.
- With your griddle up to temperature, moisten a lump of paper towel
with Oil and wipe it around so it coats very thin.
- Ladle batter to fill a small pitcher or some other device that can pour
a thin stream. Pour batter onto the griddle in a thin stream from 6 to 8
inches above the griddle. Pour in a spiral close enough so the batter
closes any gaps. It should be about 9 inches diameter, unless you want
some other size (6 to 15 inches - see Spreading
Batter).
- Do Not Cover the Pan until you are no longer seeing any more
eyes opening on the top surface. Watch the light colored areas.
- Cover the Pan and let the Injera cook for awhile. Lift the
cover and dump out the steam now and then. Traditional Injera lids
have a steam escape hole.
- Don't touch the top surface of the Injera, you'll close the
eyes and make a dent with even a light touch.
- It is Done when it has pretty much stopped steaming, but will
still be fairly soft.
- Remove it from the griddle using two turners or a very wide
device, as it is tender and fragile until well cooled.
- Cool the injera, preferably on a straw mat so it can steam
off from both sides. When cold, you can stack them on a plate.
- Re-oil the pan and repeat until you have used all the batter.
- Serve at room temperature - see Serving.
Leftover Injera can be sealed in plastic and refrigerated for a couple
of days. It will eventually get crumbly.
|